Monday, December 28, 2009

Painted Leaves on Canvas


I’m very fond of (Read: OBSESSED with) leaves and try to use them on many of my projects. On a trip to our back-garden, I found these lovely leaves (name unknown, sorry!!) which were shaped like trees themselves.


I thought they would look beautiful on a canvas, and set on to press them. You can use any leaves which are beautifully shaped. For pressed leaves, I simply put in the leaves which I like in between newspaper folds and placing a small pile of newspapers above. If you want, you can press them under heavy weights like books, but I rather the newspaper methods as it preserves some of their textures, instead of flattening them totally.

Singed Fabric Flowers – Love ‘em!!

I came across instructions for a good technique for making oh-so-pretty fabric flowers. Unfortunately, I forgot the site’s name, but on the brighter side, I do remember the how-to! Lucky me, for you can see how well they turned up!


These are dead easy to make, yet quite deadly if you get careless in the process. Not a child’s project certainly…though a child’s play for grown ups. You will need:

Saturday, December 19, 2009

Pebbles Vase

I always saw these glass pebbles sold on the beach, and loved them..but had no ideas regarding their use..


…until I found an empty whisky bottle!! I know some of you will say: “a bottle, again?..sigh!! But I love to decorate these bottles, somehow can’t keep my hands off them. So here I was, facing my pebbles, and an empty whisky bottle (you can use any other round or flat glass surface, really). 


So here is what I made...

My, isn’t that classy?
This particular project is more about imagination really, than a particular set of steps to be followed, but I’ll narrate my story anyway.You will need:

Sea pebbles (lots n lots) in your choice of colors and shapes
Glass bottle or any surface you want to decorate, really
Acrylic paints , black glass liner for stems
Paint brush
Hot glue gun, or any tough glue


You are ready now. Clean the surfaces of the bottle, wipe it dry. I painted the bottle with thick layers of olive green and sea blue, to remind me of sea and sands…I then let it dry as the coats were too thick.


After it had all dried, I proceeded to stick the pebbles with glue on to the bottle in decorative shapes. I did it in flower shapes..you can do it in the form of any shape you fancy. However, be careful not to overdo to make everything messy. Learnt that the harder way J

Here it is up close..


I tied a golden ribbon on to the neck of the bottle, coz it had gotten little messy there, so I had to cover it up that way! It does not look bad though.


There it is – I put in a twig and added a fabric flower I made with a white cloth. Doesn’t it look all dressed up and vintage!!
I hart my pebbles vase!!
I linked this beauty to a fun blog party

Tuesday, December 15, 2009

Fall inspired candle holder

Hmm..you’ll be thinking, more candle holders?? Well, I love them so much that I cant seem to keep my hands off making them. So here goes another. I found a lovely green colored empty wine bottle at my cousin’s place. She was too generous to give it to me and my mind started racing as to what should be done to make it a fabulous candle holder. Here is what I did to a plain green bottle:

I was always in love with how beautiful and magnificent the maple and oak leaves look in the fall season. In India however, we do not have maple trees. I really missed the magic of red, orange and gold leaves. All those who live in the countries abroad must be having such fun with these fall leaves. Now, I wasn’t the one to just imagine; I had to make a fall inspired candle holder somehow.
So I set to cut out paper maple, oak and other fall leaves to make my own fall collection, even if out of paper, lol! Find out how:


I cut them up, then painted them (or tried to!!) paint them in the colors of fall: tan, red, burgundy, orange.


Okay, you may find these funny as fall leaves, but they are MY fall leaves all rite!
I went ahead and stuck them in a random fashion onto my glass bottle with some fast glue. Remember that there is no specific pattern to be followed here, its all random.
After it was all dry, I outlined each leaf with the help of a gold glass liner and let it dry for another 2 hours. I know you must be thinking, drying? Again? Lol!


Tada! I captured the fall season alrite, and the memory will glow proudly as I light the candle up….
Here are all three of my glass candle holders together…oh my, they are pretty!!
I've linked these beauties to:

giveaways


and at
Funky Junk's Saturday Nite Special

Monday, December 14, 2009

Birds-on-Branches Mobile

I was kinda bored with only glass bottles as my crafting instruments, and came across this beautiful bird mobile (http://www.rufflesandstuff.com/2009/09/bird-mobile.html) by Disney at ‘Ruffles and Stuff’. Check out her blog (www.rufflesandstuff.blogspot.com), it is full of lovelies. I just love her way of ruffling things up in a classy sort of way!

Well, like millions of others who have already made this mobile, I stepped in too! The top corner of one of the walls in our bedroom was little too bare, and I set out to hang a pretty bird mobile there. Like Disney said, it was the easiest project alrite, except that the positioning of the branches is the most crucial aspect of it all. 


This is how I made this:


Amazing candle stand bottles


Once again I have been off for long, but most of the blame goes to the MBA classes which I’ve been having from 9am to 7pm even on Sundays, and its getting tiresome…phew! I haven’t been idle though, as you will see, coz I have made these ravishing beauties…


I had one or two empty wine bottles at home…u know how we keep stacking them on and on thinking they will be useful some day…anyways, I thought of making something useful with them, and came up with the idea of candle holders or stands…aren’t they too cute? And so very functional! It can two-time as a classy décor item as well as a candle holder. Read on to know how I did it!

You will need:

Friday, November 27, 2009

Cool and charming Tote from a T-shirt

I had a red and white polka dotted Tshirt that I thought did not really go well on me…actually I thought it looked li’l funny like a shirt. So I decided on a whim to turn it into a bag that I could use while going to college, or while hanging out with friends….

This whim of mine turned the T-shirt into a fabulous chic-looking shoulder bag. I love it!
Isn’t it a great looking bag? Polka dotted bags are to die for! You would surely want to make yourself one such cool shoulder bag from a t-shirt you no longer use. Its super duper easy, here is the how to:
  1. Lay the tshirt on a flat surface; iron if necessary. Trim out the collar in straight line, and sleeves too.
  2. Reverse the shirt and stitch along the bottom edge.
  3. For the handles, I used a matching red scrap fabric from another t-shirt, and cut it into three nearly equal strips. You really need not be very precise in dimensions of these strips, as it wouldn’t matter. Now tie the strips together on one end and plait them together, the same way as you plait your hair. Make two such plaits if you want two handles for your bag, like I did.
  4. Stitch the edges of these plaited strips onto the inside of the top side corners of the tshirt. You are done! Accessorize your bag with buttons to make it look cooler. If wanted, you can also stitch pockets on the inside for keeping small change.
Here is my bag:
Looks so chic and fabulous! What do you think?


I linked this to:


This was featured on
I’m loving it!

Thursday, November 26, 2009

Adorable Cutie Toys from T-shirts

Phew, I’m here nearly after ages! Though I was down with a bout of sickness, I’m back for good…I know I’ve been away for a long, long while, but to compensate with this absence, I’m here with these cutie toys…check ‘em out, they r cool!!


Okie, here’s the deal…I know the pics quality is li’l disturbing, as my camera has been sick too and has gone for repair…I had to suffice with the one in cellphone only, and it wasn’t as great. Sigh!
However, the crafty genius in you will know that these cutie toys are very easy and simply fun to make. I wanted to make some cute n easy to make toys for my niece; and was surfing through craft sites when I saw some ‘plushies’ which looked just too great. Here is the site:www.chezbeeperbebe.blogspot.com. Check out plushies and other crafts made by Holly, they are amazing! I was mightily inspired, and decided to do something similar, but let me admit that I’m nowhere as skilled at it as her!
And there were some ‘big’ problems…I had no felt lying around, and I haven’t ever tried making stuffed toys. However, I had loads and loads of old t-shirts lying around. That and the desire to gift my darling niece with these cutie toys made me go on with it, just the same. The t-shirt fabric makes the toys so very soft, and the finished toys look so very cute!! So here goes the tutorial:

  1. Take a scrapbook paper and draw this shape on it. Leave some allowance (around 1cm) for sewing.
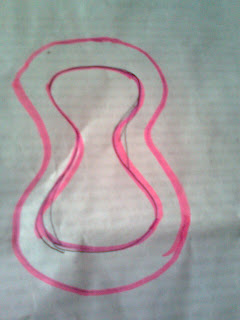
  1. Cut the shape with the help of scissors and with a water soluble marker pen; trace it along on the fabric of the t-shirt being used by you. Fold the fabric in double first.
3. You will have two pieces looking like this.
  1. Place these two pieces one over the other with the right sides facing each other, as shown in the picture below.
  1. Now sew along the edges, leaving some allowance. I used basting stitch with hand; it was so easy! Take care that you leave some gap so as to reverse the fabric so that the right side shows outside now, and also for inserting the stuffing. Use your index finger or a knitting needle to reverse the stitched fabric inside out.
  1. I know, you must be thinking that it looks very puny. Not to worry, as it will fill out as you stuff it later. Do not worry if the edges look little rough and unsymmetrical, it can be corrected and smoothened once we have stuffed the toy. Now stuff the toy with cotton or with remaining t-shirt scraps. I used t-shirt scraps as I wanted to save cotton for another project and there was a lot of fabric scrap remaining, which I decide to use up wisely, lol! Now stitch the gap completely.
The stuffed toy will look like in the pic here
It is really up to you as to how much you stuff in. I wanted only a fluffy look rather than a real stuffed toy. So I left some space inside the toy, which made it very fluffy.
7. Now for the face of the toy. You need to cut another small piece of t-shirt (preferably white) in oval or heart shape for the face, like this
I apologize for the poor quality of the image, once again. But I hope you will get it J
8. Place this fabric piece on top of the toy where its face should be and stitch along the edges once again (you can hot glue it, too!)
9. Draw cute and pretty eyes and nose with a permanent marker. You can also use the eyes that are used for soft toys. I did not have them handy, hence marker came to my rescue, lol!
10. If you want to attach ears and nose and hair, tats easy too! Take a piece of a contrast colored fabric, and draw two semicircles for ears and a circle for nose, like in the image:
11. Cut these shapes and stitch as ears and nose. Use your marker pen with renewed creativity…and you are done!! Look how pretty and cute these cutie toys look!! My niece will sure love them!
I love them all, but this one is my favorite…

Aren’t they so very cool and fun to make? Make your own cutie toys now!
Linked to
Categorically Crafting @Someday Crafts

Wednesday, November 18, 2009

Ad mantras which make the businesses go strong!

Mantra # 1: The ‘Emotional Connect’

Advertisements and promotions part of a company always catch our attention. It always amazes me as to how a small accidental phrase or idea revolutionizes the entire advertisement industry, and makes the particular a market favorite forever. The ‘emotional connect’ factor is just amazing in nature. As an ad agency, once you are successful in making the audiences able to ‘connect’ emotionally with your ad, your job is done! Well, easier said than done. Those working in ad agencies spend days and nights steaming up their grey cells to come up with the right idea for a ‘connect’ ad. There are some ads however, which are made on the ideas based on a spur of moment blurt, which makes history in terms of their popularity.

Many of us might not know this, but the most revolutionary ad campaign of the century was undoubtedly Volkswagen Beetle’s “Think Small”, which made connection with the hearts of billions of people all over the world. To make this ad attractive was a mammoth challenge for the ad agency. Where there were other newly released long, sleek and shiny cars from competitors, Volkswagen Beetle looked ugly, small and patronizing. Funnily, it started accidentally when the ad agency copyrighter compared the glove compartment of this car and compared it with a lemon. This funny comparison made it to the top selling car in the markets. To this day, ad agencies remember this comparison while trying to think of a worthwhile theme for a product.

Another marvelous ad that made sure that the Volkswagen Beetle stayed on top selling cars list using ‘connect’ mantra was the famous ‘funeral’ ad. (I’m lil obsessed with VW today!!) This was when TV was newly invented and was still a show-off. You have to watch it to believe its ingeniousness (click on the video below). A rich man dies and leaves nothing for the wife, sons and business partner as they have vices. But he leaves everything to a nephew who believes that “a penny saved is a penny earned” and drives a Volkswagen Beetle. This ingrained in the minds of thousands the idea that to own a VW Beetle is wise. Another blockbuster idea, this sure was!

Keep watching this space for more such marketing mantras, im off for now, as my testosterone calls for some craft!!

“A market is never saturated with a good product, but it is very quickly saturated with bad advertising” - Henry Ford