Friday, April 9, 2010

Curled Paper Peonies

Hey there everybody, I'm back from my superb vacation...I had so much fun, except for the unwanted tan! Since my last post was so lengthy, this time I'm gonna keep it simple. 
So here goes, I made these beauties yesterday- Curled Paper Peonies..Don't they seem fun? 

These can used to pep up almost anything - a greeting card, a closet door, or as in my case, my workspace..my computer at work is going to be adorned by them tomorrow!

These are very simple and fun to make, as they require no extensive work, and are almost frugal, as all you will need to make these is paper and glue. Glitter of course is compulsory for me, too!
 To make Curled Paper Peonies, You will need:

Paper:  Several types of paper were used. I painted cardstock paper with shades of pink glittering acrylic paints, as evident in the flowers above. I also spread some plain paper and magazine pages under some bottles I wanted to spray paint in silver color. You can see that in the pic below:

This helps in recycling otherwise unused paper, and also saves on glimmer mist or sparkle paint! I know, clever :)

Glue, Skewer or toothpick (for curling), Scissors, and glitter are needed too..Lets get started now:

You will basically need to cut three or four 9-petal flowers for making one peony. Templates are available everywhere on the internet for these. You can choose the size of flowers and their number according to the desired fullness. I found three flower shapes satisfactory for one full peony.

I cut these 9-petal flower shapes from out of cardstock paper, mag pages, plain paint-splattered pages, and some gift papers as well. I know, you're thinking what next!

Next, place three alike flower shapes on a plain surface. Do not bother with the first flower. Cut one petal from the second flower, and two petals jointly from the third flower, as in the pictures below (I included two pictures so you're more clear about it).:

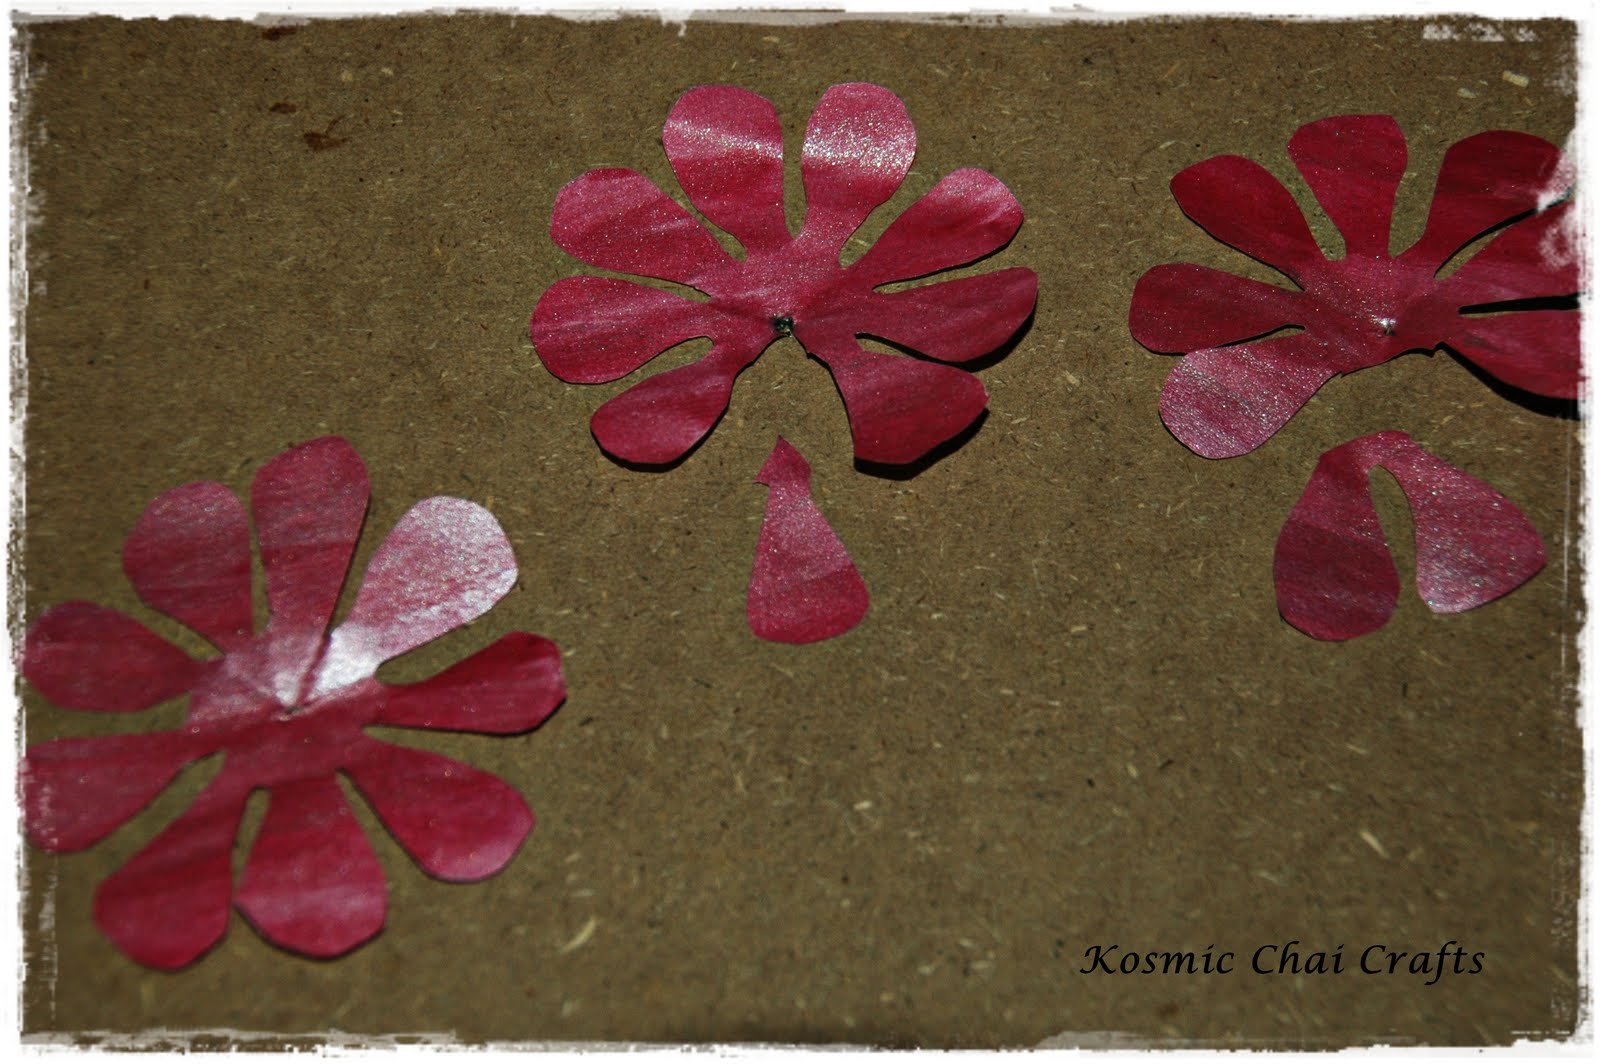
Now glue two petals together so that they overlap. Note that for the second and third flower, this overlap should be done for the petals across the gap where you had cut petals previously (you still there, after this line??). 

Now hold the skewer or toothpick in a hand and curl each petal of the flowers outwards as shown here. Just a gentle curl will do the trick, no pressures required.

The first flower with no cut petals forms the base, the second flower with one cut petal get glued over the first, and the third flower with two petals cut needs to be glued topmost. Now scrunch the flowers together ever so lightly, like this:
Now for the cut petals - Curl them with the help of skewer as well, and place on the top of the stack of curled flowers. Glue in place. And we're done, Voila!!!
There you go, your flower is ready! Now attach it to a vase, or a gift..People will always admire their simple beauty.

Linked to these fab parties..come, join me there!

Tuesday, March 23, 2010

Spring-y Summer-y Beach-y Bracelet!

Cheesy title again, I know but I couldn’t help it…since this week was quite boring and dull for me, and I wanted to shake it off through the title!

CAUTION: An extra lengthy post ahead..move at your own risk!

This week we spotted our little jungle friends in our library upstairs..’termites’! The Pest Control people were immediately intimidated, and as a result our home was turned totally upside down. We packed, unpacked and now are packing our stuff again, ‘coz the husband and I are going out on a holiday! Yay, finally! More on that later!

The house was in shambles, but I so badly wanted to make something crafty, that I came up with this cutie li’l thingy!
b0
Those are glass gems, yes! It looked so springy, summer-y and beach-y, that I had to name it the same! I love the messy, tangled look, and thought some others might like it, too!

To stretch a short story long, I was busy packing, yet just had to make something, when I confronted some strings with glass gems stuck to them in tangled mess. Now if you have seen my older post where I made a butterfly and glass gem mobile, then you will know where those strings came from. First time readers don’t panic, I’ll ramble about it from the start!

You will need: Glass Gems, Yarn thread, Tacky Glue, and the ability to tangle the threads finally! (that comes naturally to me!)

Now follow these simple instructions to make your glass gem strings:
Cut the yarn threads in the desired length and number. If you want a fuller and heavier bracelet, use 4 strings. 2 strings should do for a simpler one. I used 4 strings, each 15 inch long.
Now, the glass gems obviously wouldn’t be fully secure onto the thread if you simply stick them to the strands. So you need to make a ‘seat’ for them so that you can safely glue them onto the threads, forever secure. The ‘seat’ is made as follows:
5
6
7
8
Easy- peasy, isn’t that? Let them dry for few hours. The pics are borrowed from a previous post, since I had my strings readily made for me from the previous project.
The next step is mighty easy, and even if I do not have the picture for this step, you will be able to do it easily! Simply hold the glass gem strings and give them a good shake. Yarn tangles easily, yours will, too! Don’t bother to keep the loops straight and let them tangle. When you’re satisfied with your ‘tangled mess’, start wrapping them around your wrist. Do it in such a way that the ends are knotted and tangled as well. b3 b1
Now wear it on a sunny day to the beach, like I’m going to, soon!
I love how it sparkles in my hand!b4
And I love it in sepia colors as well (don’t know if I can get glass gems in these colors!)b2
Make yourself one, too!
Now about my vacation – I’m going to visit these fab places:
It’s a good combination of ancient heritage places, and gorgeous beaches…I’m gonna have fun!                                                     Goa ...Oh, I love beaches!
goa1 Goa4 goa3 goa2
Now  I'm off to meet my dear friends now before leaving, see you next week!
Linked to these fab parties..do 'attend'!
Tutorial Tuesday @Hope Studios
Get Your Crafts On @Today's Creative Blog
Tip Me Tuesday @Tip Junkie
DIY Day @ A Soft Place To Land
Weekend Wrap Up Party @Tatertots And Jello
Creative Cats @ Poppies At Play
Show Off Your Stuff @Fireflies And Jellybeans
Whatever Goes Wednesday @Someday Crafts

Friday, March 19, 2010

'Feature-istic Friday' #1 !!!

Welcome to the ‘Featuristic Friday! This is the first post for this event, and I’m  very excited to show you some projects I like best around the Blogland…I’m doing this so our fellow bloggers can share some inspiration. If you think any of your creations – new or old, deserves to be here, then please e-mail me the link to that craft. I will feature it the next friday if I like it! Good way to get more clicks onto your crafts, too, especially the older ones which are now somewhere invisible in the archives. Send me some links, ladies!

Here are this week’s favorite picks:

Shannon from Posh Pieces made this delightful and unique Paper Flowers Wreath. I LOVE this!


Kalleen from At Second Street came up with this fun Mod Podged Hand Trees!  Such a great way to involve kids in something crafty!

IMG_4090


If you haven’t ever been to LollyChops ever, then you really have missed a lot of crafty fun and humor..Lolly is fabulous (and so is teal ;)) Check out these amazing Tissue Paper and Paper Flowers.. While you are there, check out her other amazing crafts as well, and take a lemonade along. You will thank me for this, I know!

6a00e553eafb0688330120a8e22dd4970b-250wi 6a00e553eafb06883301310f48f2e5970c-250wi


I love flowers and anything flowery! Check out this wonderful Fabric Flower Necklace whipped up by Vanessa at Craft Envy. Yes, there’s a tutorial!

DSCF0001


Julie from No Money Mama made these Sweet Little Birdies..Hoping I’ll be able to make them,too!

birdclose8


Julie from Growing Your Grass Greener made this fabulous Springtime Ribbon Wreath. So very unique!
020

There, you have your dose of inspiration! Now start searching for your craft stash and whip up something new yourself! Do remember to send me your links for the next Feature-istic Friday!
Those whom I've featured here can grab my button on the right sidebar! You totally deserve it!!

Thursday, March 18, 2010

Get Featured on 'Featuristic Friday' on Kosmic Chai Crafts

Hello Readers,


There are some exciting features coming up on this blog. From now on, you will find 'Feature-istic Friday' posts on Kosmic Chai Crafts, where in I will feature various attractive crafts from around the Blogland. The featured crafts can be anything - decor, recycled ones, repurposed ones, a furniture redo, anything at all as long as its fresh (as in non-repetitive) and genuine. 

If you wish to participate, please mail me your project links at the following email address:
anjanasonia(at)gmail(dot)com

I will feature the best ones here! I will choose some projects by myself too, so do not be surprised if you get a mail from me declaring that you are being featured here! Start e-mailing now, let's look at some great creations!!


Tuesday, March 16, 2010

Spring Flowers Mobile From Plastic Bottles

I finished my spring flowers mobile quite some time ago, but things have been so hectic nowadays that I didn’t get time to post it till now.
a0
a5
Can you guess what these flowers are made of?? (Of course you can – that’s plain evident) These were made of plastic bottles!
Recycling is the new buzz around the Blogland, and I’m into it as well. So this time it was plastic bottles – did you know that only 20% of the overall plastic bottles are recycled ever?
a1
That seemed just so awful, and I decided my next project would be from plastic bottles- everyone has so many of them around! So here’s the final product: Spring Flowers Mobile!
I’ll be honest – the flower making takes some time and lots of patience. But I guess all of us ought to recycle things in our own style. If you decide to make this, then you will need:
Plastic bottles –lots and lots (I used about 20)
An old butter or normal knife 
Strong scissors with teeth or Exacto knife
Acrylic Paints
Fishing line thread
Embroidery or metal hoop
Satin Ribbon
Lets get started! In order to cut flower shapes we need to poke a hole at the bottom of the neck of bottle. Some choose to drill a hole, but I hate heavy machinery, so I found an old blunt buttering knife which I put onto the stove flame for around 30 seconds, and poked into the desired place on the bottle..it does melt a hole as if plastic is merely butter!
a2
Easy Peasy! Now draw some flower petals around the bottle’s mouth and cut them by inserting your strong teethed scissors through the hole you just poked. This does take some effort in the starting stage, but slowly you get the hang of it. Don’t these flowers look very cute?a3
I also used the flower shaped base of the bottles by cutting around the shape. The middle part of the bottle looked like it could be used as well so I drew some flower shape on the middle part of the bottle as well and cut it.a4
Now for the fun part. Paint the flowers in your favorite colors..I guess its not difficult to guess which is mine!             a5
Right, I love blue! Now pile the flowers over each other the way you want them to hang from the mobile:                     a6
Now take a strong needle and thread it with some fishing line. Poke a hole through the piled flowers like this:          a9
Decide the length of the flowers to hang from the mobile and knot the ends accordingly.  Repeat the same for all the flowers.
Now take one flower pile at a time and knot the upper end of the fishing line onto the embroidery or metal hoop.  After you finish knotting all the flower threads, take a longish piece of satin ribbon, glue an end to the hoop and begin rolling it around the hoop. for more precise instructions regarding the making of a mobile, go here.
Now cut four equal lengths of ribbon and insert them into four opposite corners of the hoop so that they hold the hoop securely. Tie a knot and hang your mobile from a hook.  a8
a0
a7
There, isn’t it pretty! Some might not find it that pleasant, but I’m mighty proud of my recycling skills!

I'm going to join fab parties this time, but sorry that I can't include all the party buttons as it makes the posts look very cluttered. I'll just be including the link to the party now on..hope that's okay with the party organizers!!


DIY Day @ ASPTL
Whatever Goes Wednesday @Someday Crafts
Make it Yours Day @My Backyard Eden
Penny Pinching Party @The Thrifty Home
Craft Schooling Sunday @Creative Jewish Mom
Show off your Stuff Party @Fireflies and Jellybeans
Get your Craft On Thursday @Life As Lori
Strut Your Stuff Thursday @Somewhat Simple
Great Idea Day @Infarrantly Creative
Craft Concotions Friday @That's So Cuegly
Creative Cats @Poppies At Play
Weekend Wrap Up Party @Tattertots And Jello